Cooking sushi rice (seasoned with ready vinegar mix)
1. Measure 4 cups (4 dl) of sushi rice into a pot. Rinse with cold water until the rinsing water starts to get clear.
2. Measure 5 cups (5dl) of cold water into the pot. Let the rice sit in the water for a good 10 minutes.
3. Bring rice to a boil at the highest setting of your stove, place lid on top and let cook on the lowest setting for another 15 minutes. You can carefully stir it a few times just in case, and check its progress around 10 minutes. You can cut and otherwise prepare your intended fillings/toppings while waiting for the rice to cook!
4. Pour cooked rice into a bowl (ceramic, wooden or plastic, as the vinegar may react with an aluminum or metal bowl), measure 1/2 cups (1/2 dl) of vinegar mix into a cup and, by gently folding the rice, mix into the bowl.
5. If you don't immediately plan to use the rice, cover the bowl with a wet cloth or towel.
Making basic maki rolls
you'll need:
- A bamboo mat (or, for example, cooking paper) for folding
- Nori seaweed sheets
- Preferred fillings (for example, cucumber or raw/cooked salmon)
- A sharp knife
- A cutting board
1. Put a nori seaweed sheet on a bamboo mat. Spread a thin (or thicker, depending on the wanted size of the rolls) layer of rice along the edge of the nori.
2. Place the fillings you intend to use (preferably sliced into long strips, if applicable) in the middle.
3. With the help of the bamboo mat, form a roll. If the end of the nori won't stick, moisten it up a bit and roll so that the seam ends up on the bottom.
4. Carefully lift onto the cutting board. Moisten the edge of the knife with either water or vinegar, and carefully slice into pieces you deem a good size.
5. (optional) Put into fridge to set and cool off. This makes the vinegar firm up the rice, making it easier to eat with chopsticks.
Making nigiri (my way of doing it)
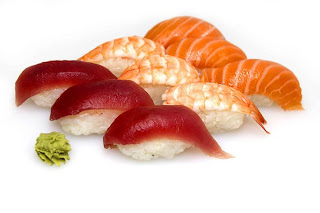
1. Form small, firm, flat cakes out of the rice and let set in the fridge for a bit.
2. Place preferred toppings (for example avocado, salmon or shrimp tails) on the cakes.
3. If you want, fasten the toppings with a thin band of nori.
 |
| Picture borrowed from http://battersea.ta-makisushi.net/ |
Making gunkanmaki
Suggested fillings:
- Fish eggs (if you're into that stuff)
- A mixture of tuna, red onion and creme fraiche
- Crab meat
- Mayonnaise-vegetable mix
- Whatever the heck you think will taste good
1. Make small balls or cakes out of the rice (see nigiri) and cut a sheet of nori so that it fits around the rice, but leaves some space on the other end (to be the top; the "bowl" to accomodate the filling")
2. Roll the nori around the rice and turn so that the rice bottom faces down. Insert toppings in the formed "bowl".
3. Again, optionally, put into the fridge to set.
Serve with, for example, soy sauce, slices of ginger and wasabi.
For a grande finale, here's the sushi I made! Taking into account that it was my first time, I don't think they turned out half bad. Of course the nigiri were made as a leftover rice afterthought, and as you can see, the gunkanmaki is too tall and chunky to stand on its own, but I ADORED my cucumber maki rolls. Also one small tuna maki featured behind the Behemoth of a gunkanmaki.


No comments:
Post a Comment